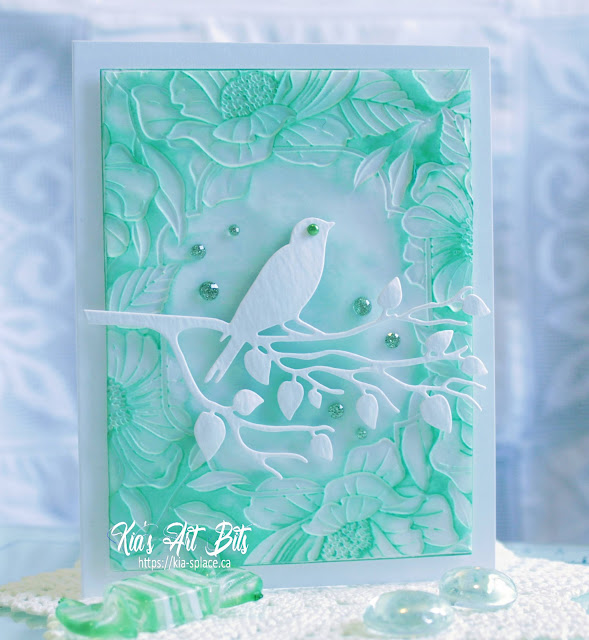
This card is "Bird and Branch".
Today I have made two cards to share with you embossing with vellum. As I explain below, I was watching a video by Tiffany Solorio which was about embossing using Vellum, which I found challenging when using the 3D embossing folders.
I ordered the vellum from the States as it was not available in Canada at Amazon, nor anywhere else I searched. The one I ordered is linked in the card below.
To change up the background design I cut the vellum smaller at 3.75x5. I then applied Cracked Pistachio to the back of the vellum paper by running my mini ink cube over the impression. Following that, and using my ink brushes I applied further ink to catch the areas I may have missed.
I then glued the vellum to a piece of white cardstock using vellum tape, which does not show through. It is applied to all four sides of the vellum.
I then added foam tape to the back of the piece and attached it to my Neenah cardbase. I die cut the bird from heavy cardstock and styled it slightly, then attached the bird using foam squares. I added a green pearl for his eye.
To finish off this card I added a few Pinkfresh Glitter Drops around the card. I hope the above card shows how I used that same embossing folder in a different way, which follows.
This is "Sparkly".
Recently I have been trying to make a point of using some of my older stamps and dies, along with current projects. I always feel better when I can stretch what I have already.
This card is one of those cards. The leaf stamp and die set are by Dina Kowal via Impression Obsession. They have since been discontinued, but it remains a favourite of mine. I have tried to find something to replace this set, but nothing quite does it for me. One that comes close is this one.
The embossing folder background is by Spellbinders and called Four Petal Floral.
When looking at the card one would think this is white cardstock that has been embossed with the embossing folder. But I have used Vellum for the embossing folder instead. I watched with interest a video by Tiffany Solorio, where she talked about difficulties embossing with vellum.
I was happy to hear that she talked about the thicker vellum, as I had bought some which I had to get at Amazon in the USA. Grrr - sorry but the dollar and Amazon just about kill me, and Amazon Canada is even worse!
I digress, back to the vellum. I bought this package of vellum to use for this type of embossing. I did spritz the vellum heavily, meaning 3 spritzes per side. The reason for this is I found it helped relax the vellum hence the embossing folder did not cause any holes in the vellum.
You can see the details in real life, but I did add white pigment ink around the floral embossed edges, along with white splatters. I also cut the background branch using the same vellum, then coloured using Cracked Pistachio distress ink by swiping the colour on, then turned it over before glueing it in place.
The other leaves were done using distress inks in Crackling Campfire, Fossilized Amber, Carved Pumpkin, Aged Mahogany and Ripe Persimmon and die cut. I then attached them in place, gluing the middle one in place, then using thin foam squares to apply the top branch.
For the sentiment I used a Penny Black stamp set called Snowflake Season, picking the sentiment about Sparkly which I heat embossed using gold embossing powder, then stamped the sentiment about walking in the woods on the inside of the card.
I do hope you have enjoyed these cards today. I fussed with it for the better part of the afternoon, but that is okay as I am now happy with the end results.
See you next time.


.jpg)

.jpg)

a.jpg)
Stunning display of your designs and fabulous description on your blog, I am loving the way to use the vellum xx
ReplyDelete